Position Playing vs. Playing Up and Down On One String...
From the previous lesson we learned the major scale formula: W W H W W W H. That is, the major scale consists of 8 notes with half steps between the 3rd and 4th notes and between the 7th and 8th notes of the scale. The other adjacent notes have whole steps between them.
I also mentioned that there are 2 general ways (or styles) of playing on the guitar:
- playing in position, aka: playing vertically
- playing up and down on one string at a time, aka: playing horizontally
Both of these styles have their advantages and disadvantages as you will discover (or already have discovered.) Most guitarists tend to neglect playing horizontally, and I believe this really works against them. I can't emphasize enough how important it is to play up and down on one string at a time. If you want your playing to sound melodic and want to improve your overall musicality then this is the sure-fire way to accomplish that goal.
In this lesson I will show you how to play a major scale on a single string on the guitar.
Most teachers begin by showing a student a major scale in open position, but I think this is the wrong place to start. I believe a student gets a much better understanding of a major scale by seeing it and playing it up and down on a single string. This approach simplifies matters greatly and has some very beneficial side-effects. Here are a few for starters:
- It's simple and straight-forward. Simple is always a good place to start when learning something new.
- It helps the student to become less afraid of the higher positions on the guitar.
- It's easier than playing in position which helps a student experience an early sense of accomplishment. This usually motivates the student to explore further.
- It helps to instill the major scale formula in the student's mind. A student really has to think about whole steps and half steps to play the scale correctly. From my experience if a student first learns a major scale by playing a pattern of the scale in a fixed position then she loses the essence of the formula when she jumps to different strings within the pattern. She does not yet understand the tuning or intervallic relationship between the strings of the guitar and hence her learning does not go as deep.
- Ideally, playing up and down on one string at a time forces the student to think about note names instead of simply relying on fingerings for a specific pattern.
This list could go on, but I will stop here. For more great ideas about why horizontal playing is so good for your playing consult Mick Goodrick's book called The Advancing Guitarist. This is one of those books that will keep you busy for a lifetime. His book is not so much a "method for the guitar," but rather, it's a great source of ideas and cool ways to think about music.
So without further ado...
The C Major Scale on the B-string...
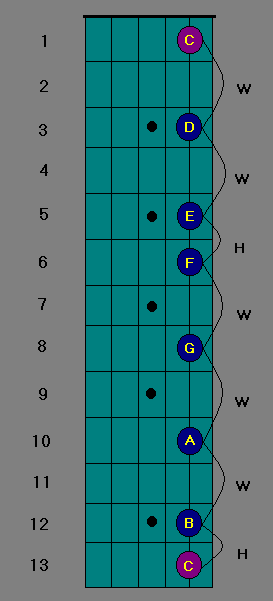
Here is an illustration of the C major scale with the root starting on the first fret of the B string (the second string of the guitar) and ending at the 13th fret. I have drawn the root notes in purple to differentiate them from the other notes in the scale.
I have also drawn black fret markers in this diagram at the 3rd, 5th, 7th, 9th and 12th frets. These markers, or inlays, are very common on most guitar necks and help one find their way around the fretboard. Without these markers it's very easy to get lost.
As you will discover once you get to the 13th fret, the pattern repeats. This is just how the guitar works. You see, all of the open notes on the guitar are repeated one octave higher starting at the 12th fret of the guitar. It follows then that notes at the first fret on the guitar are repeated one octave higher at the 13th fret and notes on the 2nd fret are repeated one octave higher at the 14th fret. This pattern continues until you run out of frets (or string.)
I have also drawn the major scale formula in this diagram - labeling whole (W) steps and half (H) steps between the appropriate notes.
Play this scale slowly with your index finger. Don't worry about speed. Simply try to get a good tone from the string. Listen to the notes. I bet this scale sounds familiar to you.
The C major scale can be played using this pattern on any string of the guitar. Simply find a C note (your starting and ending note) on the string you wish to play. Once you've found your starting note, play notes according to the WWHWWWH formula. This will yield (or produce) a C major scale. It's that simple.
For example, if I wanted to play a C major scale on the 5th string I would start at the 3rd fret. If I wanted to play a C major scale on the G string or 3rd string of the guitar, I would start on the 5th fret.
Now here is a beautiful and simple fact about this configuration of notes: One can play any major scale with this pattern. First, decide which scale you want to play. Say you want to play a G major scale. Now find the root note on the string you wish to play. In this example let's start at the G located on the low E string at the 3rd fret. Starting with this low G, play notes using the WWHWWWH formula. These notes produce a G major scale. For the most part, you know you have played the scale correctly if you end 12 frets higher on the G note at the 15th fret of the low E string. Now go down the scale and repeat this process a few times. Voila, a G major scale on the low E string.
Now, do this for all major scales in all keys on all strings of the guitar!
What? You're thinking I must be crazy, but it's not as bad as you think. If you do this, you will have started on the path of becoming a great guitar player. Just remember to be patient. It takes time, many years really, to learn how to play well.
Where are the notes on the guitar?
At this point you might be asking yourself, how do I know where the notes are on the guitar? Well, if you have read and understood this lesson as well as the previous lessons, you already have enough information to figure this out. As an exercise I encourage you to do this.
You know the tuning of the guitar. If you don't click here.
You also know the intervals in between all of the natural notes. (I just gave you a major hint.) In fact, the best way to learn the notes on the guitar is to first learn where the natural notes are located. Once you do this, all the other notes will follow as they are expressed in terms of the 7 natural notes.
Click here for a blank tableture diagram of the first 15 frets of the guitar. Print it out and then fill it in with the natural notes. This will become a valuable tool for you and I encourage you to refer to it as a means of strengthening your understanding of the fretboard.
If you're really lazy check this out: Natural Notes On The Neck Of The Guitar, but I encourage you to do the exercise first. Use this to check your answers.
A Playing Exercise - An Intro to the Major (Ionian) Mode...
Now here is a great little exercise that I got from Mick's book - the book I mentioned above. You will need a way to record your guitar. If you only have a little tape recorder that will do just fine. You don't need your recording to sound like a million bucks. We just want to get some chords down on tape so we can play over them.
First, record the following vamp. A vamp is usually one or two chords that are repeated over and over again - a little jam, so to speak. Consult the following diagram for chord fingerings and the harmonic rhythm for the chords. Harmonic rhythm refers to the number of beats a chord gets before changing to the next chord. In the example below, each chord gets 8 beats - the harmonic rhythm does not change or vary.
Make sure your recording is at least 3 or 4 minutes long. Play any strumming pattern you like - something mellow works great, that is, something not too fast is preferable. This is a listening exercise as well as a playing exercise.
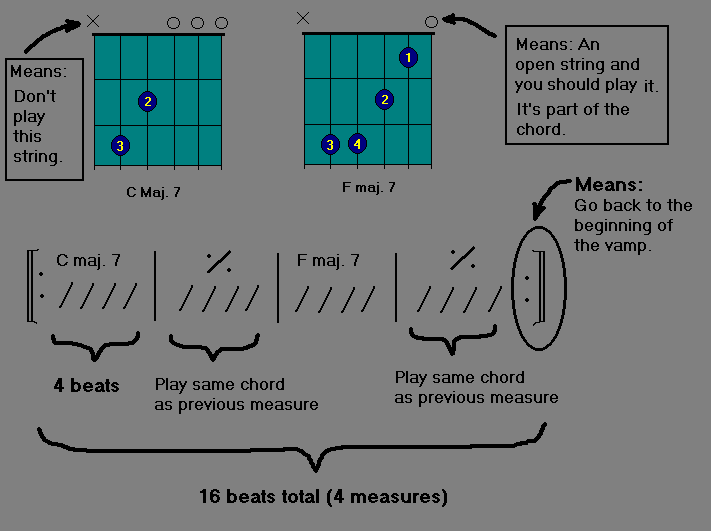
Notice the little symbol above the hash marks in the second measure. It means to play the same exact thing as the previous measure. So you will play a C major 7 chord for 8 beats before changing to an F major 7 chord.
Also, notice the 2 little dots at the end of the 4th measure to the left of the barline? This is a "repeat" symbol and it means to go back until you find 2 dots to the right of a bar line. In this case, we go back to the first measure of the vamp. So these 4 measures repeat until we get sick of them. In computer parlance - this would be considered an infinite loop - very bad, but in music, it's totally cool.
Now, while listening to the tape, improvise a melody on the high E string using only natural notes on the guitar.
Be sure to use only the high E string for the full duration of the song. Also, be sure to play only natural notes (notes in the C major scale.)
The whole point of this exercise is to see what you can do with only one string of the guitar and only natural notes. It also happens to be a great way to learn the natural notes on the guitar one string at a time.
After you have finished playing along with the tape, rewind it and play over it again, but this time, use only the B string. You will be tempted to jump to a different string while you are playing, but I encourage you to resist. Stay on only one string for the full duration of the vamp.
This is a kind of "limiting" exercise. That is, when you impose a limitation on your playing you simplify things. This makes it easier to learn for obvious reasons.
Now repeat this exercise for each string of the guitar. If your vamp is 4 minutes long you will have to play at least 24 minutes before you get through all 6 strings of the guitar. You will notice that some notes sound better over the C major 7 chord while other notes sound better over the F major 7 chord. Also, some notes work for both chords very well. Why do you think this is so?
In later lessons I will expand on this exercise as it will be a kind of "foundational exercise" for something called modes. For now, just be aware that these two chords are derived using a C major scale and that's why the C major scale sounds good over this vamp. Another thing to make note of is that this mode is called Ionian or the Major Mode. All of the modes will be discussed in more detail in later lessons. This is just a brief introduction. Good luck and make some music!
Go to the next lesson, Lesson 4, or go back to the main menu.