Definition of An Interval and a Slight Rant...
An interval is just a distance between 2 notes. As I said in Lesson 2, music theory is a "language of comparisons" and we use special terminology (words like "minor 3rd" and "major 6th") to describe these comparisons or distances.
This is a keystone lesson because the concepts presented here form the foundation of music theory. Once you've mastered this material or at least have a good handle on it, you will have essentially mastered the language of music theory. That is, most concepts in music theory are expressed in terms of intervals so the better you know this terminology, the better your understanding of music theory will be. It is extremely important to apply this theory to your instrument as you study. If you don't make the connections between theory and your axe there's really no point in studying this stuff. The two should go hand in hand with the main goal being to make good music.
When I first started playing I used to spend many hours applying theory concepts to my guitar playing. I would record vamps and then solo over them. (Still do, actually. Give a listen to some of my recordings if you want.) This practice of recording and improvising is what initially got me into recording and composing music followed shortly afterwards. I encourage you to do the same thing. After all, if you don't really play your own music, then what's the point of it really? You need to personalize this stuff. That's the only way things will make any real sense and making your own jams and recordings is a great way to accomplish this goal. It's also cool because then you have a record/repertoire to track and catalog your accomplishments. It's also a good way to hear how you sound to others. The tape never lies.
Writing exercises and tunes is not as hard as you might think. Get creative. Use your imagination and make practicing fun. Try to make your practice sessions as musical as possible. Practice what you want to sound like. Make it a kind of performance. If I have a choice between running scales for 10 minutes or improvising for 10 minutes, I always choose the latter. After all, I don't want to sound like scales, I want to sound like I'm improvising.
Remember: Always keep in mind that your end goal is to make good music. Keep things in perspective. Theory is a tool and should be used to the extent that it helps you become a more inspired, focused and better player. Studying this stuff shouldn't just be to learn a bunch of theoretical mumbo-jumbo for its own sake. You are in control, not the theory. Be patient with yourself and persevere. Don't give up. Practice. Strive for creativity. Eventually, your work will pay off and you will be a better player. So let's get started on the "nuts-n-guts" of music.
Back to the Table of Contents.
The Staff...
The best way to see how intervals work is to look at concrete examples, but first let's get acquainted with some new musical symbols and terms. We have, the staff.
- As you can see, the staff is a grid of 5 horizontal lines. We place notes on the lines and spaces of the staff. Each line and space of the staff represents a specific pitch or tone.
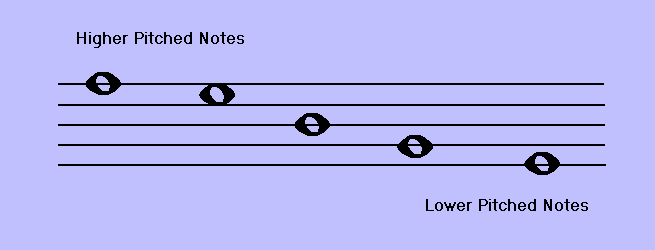
- The position of notes placed on the staff visually represents the relative "highness" or "lowness" of pitches. The higher the notes are on the page, the higher in pitch they will sound.
Now an interesting question arises. How do we know which note names are associated with which lines or spaces of the staff? Well, the answer is that we use a special symbol called a clef. There are a few different types of clefs but we're only concerned with the g-clef as that is the clef that we use to notate GUITAR notes.
TIP: If you would like to learn more about how to sight read music for the guitar, I encourage you to pick up a book called Solo Guitar Playing: Volume I by Frederick Noad. It is the best introduction to sight reading for the guitar I've been able to find.
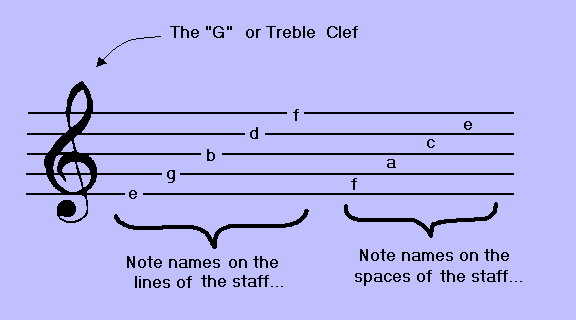
- The g-clef is also called the treble clef and it is used to designate the second line from the bottom of the staff as the "g" line. That is, the second line from the bottom of the staff is where the first "g" note above Middle C is located. Please note, this "g" line can contain "g sharps", "g flats" or "g naturals." (More on this later.) For now just understand that we need a way to tell the musician how the lines and spaces of the staff are assigned note names and the G-clef does just that. Like I said before, there are other clefs, such as bass-clef, but don't worry about them. I'm only going to notate notes using the g-clef.
- You will notice that the note names on the lines of the staff are: e, g, b, d, f and the note names on the spaces of the staff are: f, a, c, e. You may have heard one of the following little expressions that can be used to help you remember the note names on the lines of a treble clef - "every good boy does fine," or "every good boy deserves fudge," etc. Do whatever it takes to get these note designations memorized. They should be second nature to you.
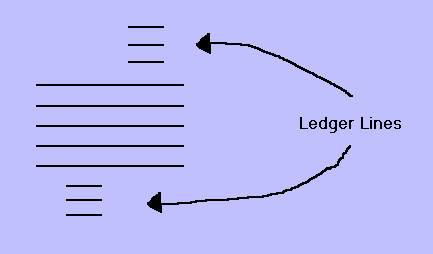
Sometimes we run out of room on the staff and need to draw lines above or below the staff to place our notes. These lines are called ledger lines and they are used to extend the staff.
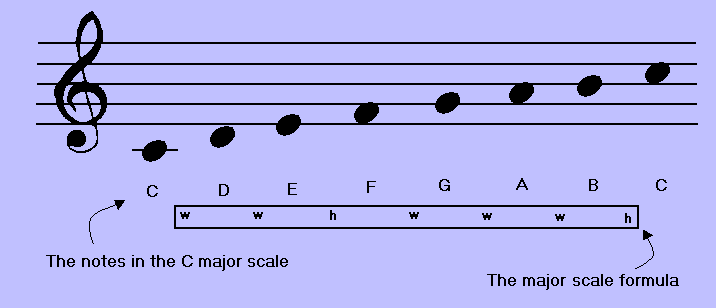
Now let's look at the C major scale drawn on the staff. Notice that the first note of the scale, the C note, is drawn using a ledger line. This note is called Middle C as it is roughly located in the middle of a piano keyboard. Again, please be aware that half-steps exist between the notes E and F and between the notes B and C. The rest of the adjacent notes in the scale have whole-steps between them.
Back to the Table of Contents.
Diatonic Intervals...
Now before we get into the "nuts and guts" of intervals, let's look at some diatonic intervals for the key of C major. But, before we do this, I need to define what the word diatonic means. In short, it means "in the key."
For instance, the D note is diatonic to the key of C major because it is the second note of the C major scale. That is to say, a D note is in the key of C major. An Ab (A flat), however, is not diatonic to the key of C because Ab is not in the C major scale. Ab would be considered a non-diatonic note in this respect.
It only makes sense then that a diatonic interval is an interval that is derived using notes from a particular scale or key. That is, we pick a key and stick with it. We only use notes from that particular scale to make intervals.
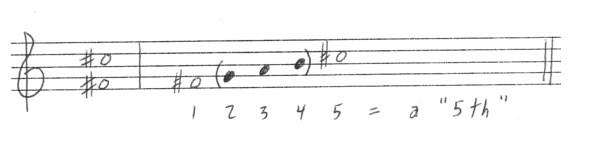
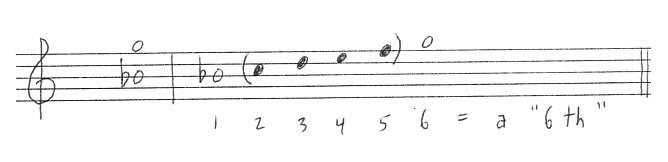
Diagram 6 shows some diatonic intervals using the C major scale. (All of the intervals are derived using only natural notes or notes from the key of C.) The diagram shows the distance of each scale tone relative to the root note of the scale. These intervals are important and should be memorized because they are always the same for all major scales. That is, if we compare each scale degree with the root for any major scale, we will always get these same intervallic relationships - a unison or perfect prime, a major 2nd, a major 3rd, a perfect 4th, a perfect 5th, a major 6th, a major 7th, and an octave or perfect 8th.
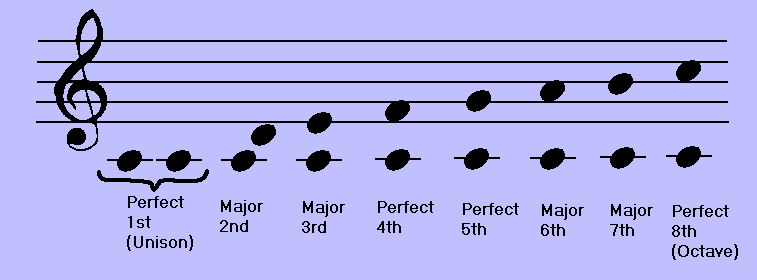
There are 8 different intervals in the diagram above - let's analyze each one in terms of how many half steps higher the top note is compared to the bottom note. You can use Diagram 9, at the bottom of this page to help you compute half steps.
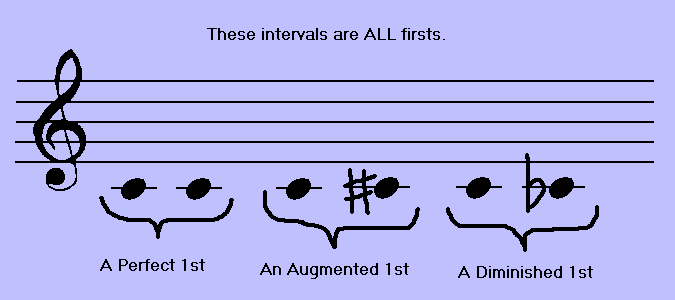
- The first interval is called a unison because both of the notes are the same note. That is, the two C notes are right next to each other in the same octave on the staff. Although there is "no distance" between these two notes we refer to the distance as "some kind of first", or more specifically, a perfect prime. Obviously, there are no half steps between these two notes.
- NOTE: The unison is an important interval on the guitar as perfect unisons are usually the first way we learn how to tune our instruments. If you would like to know more about tuning your guitar using unisons, click here. I have also included some ideas about why it's good to tune by ear. In other words, this link is worth looking at even if you already know how to tune using unisons.
- The next two notes are a C and a D and the distance between them is called a major second. This distance is equivalent to a whole step or 2 half steps.
- The interval between the C and E notes is called a major third. The E is 4 half steps above the C. (Remember to use Diagram 9 to help you determine the number of half steps.)
- The interval between the C and F notes is called a perfect 4th. Again, if we measure this distance in half steps we discover that the top note (F) is 5 half steps above the bottom note (C.)
- The interval between the C and G notes is called a perfect 5th. The G is 7 half steps above the C.
- The interval between the C and A notes is called a major 6th. The A is 9 half steps above the C.
- The interval between the C and B notes is called a major 7th. The B is 11 half steps above the C.
- The interval between the low C and the high C is called an octave or a perfect 8th with the high C being 12 half steps above the low C.
- And finally, click here to see how to play these 8 diatonic intervals on the guitar.
In the next couple of sections in this lesson, we'll go deeper and I'll attempt to explain how the "language of intervals" or intervallic nomenclature really works. I'll present a method which you can use to compute their names ("major 3rd", "perfect 4th" and so on). By following this method, you will be able to understand the "distances between notes" using very precise intervallic terminology. But first, take a break!
Back to the Table of Contents.
Take a break!
Do some yoga or take a bath.
Two Components of An Interval...
As you may have surmised at this point, intervals have 2 components to them - some kind of name or quality (major, minor, perfect, etc.) and some kind of number or quantity (1st, 2nd, or 3rd, 4th, 5th, 6th, 7th, etc.)
Now here is a tough, but important, question to answer: How do we figure out the quantity and quality components of an interval? There is no straight-forward answer but I will try to explain a method that you can use.
The Number Part of an Interval: The Quantity
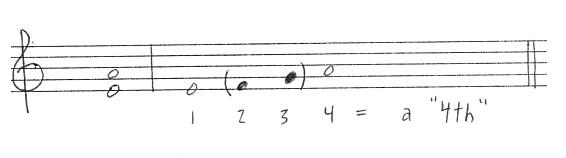
This is actually not as bad as you might think. Let's use some examples to illustrate a method. Say we want to figure out the distance between a D and an F note. Here are the steps to do it:
- Count your starting note (the bottom note) as the "number one." In this case, D is the first note so we assign it the number one, D=1.
- Now, count the alphabet (or the number of lines and spaces on the staff leading up to and including the top note). That is, count up to the second (or higher) note of the interval using only natural notes or the first seven letters of the alphabet. In this case we count like this: D=1, E=2, F=3. This means that the distance between a D note and a F note is "some kind of 3rd." (Don't worry about any sharps or flats you might encounter - I'll explain in just a bit.)
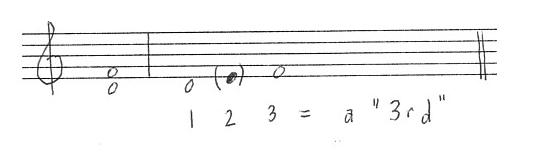
In short, the number part of an interval is directly related to the distance notes are from each other on the staff.
Here are a couple of other examples to illustrate this idea further:
-
The distance between an E and A is some kind of 4th because E=1, F=2,
G=3, A=4.
-
The distance between an F# and a C# is some kind
of 5th because F#=1, G=2, A=3, B=4, C#=5. Don't
worry about the sharps. They are not a relevant component needed to
determine the "quantity part" of the interval. Do you see why?
Think of how the notes are placed on the staff. In other words, what's the difference between an F#'s location on the staff versus an F natural's placement - assuming both notes are voiced in the same register or octave?
-
The distance between a Bb and a G is some kind of 6th
because, Bb=1, C=2, D=3, E=4, F=5, and G=6. Again, ignore
the flat in this example because accidentals
are irrelevant when determining the location of a note on the
staff. All we need to concern ourselves with is that
Bb is some "kind of B." Why? Because it is the "natural
note part" of a note's name that positions that note to a particular
line or space on the staff -
an important idea indeed.
If you look below at diagram 7 things might get a little more clear. In the case of the first interval, the unison, count the first note at the ledger line as "one." And since we are going to the same spot (or vertical distance) on the staff to get to the second note, we can rest there. We know that we have "some kind of first." It doesn't matter if the second note were a C# or a Cb. In every permutation (combination) of C naturals, C flats, and C sharps, we will always get "some kind of first."
In Summary: Count the first note as "one" and then count the number of lines and spaces leading up to (and including) the target or top note of the interval. The number you finish with is the number part for that interval. I call this process... "counting the alphabet" because we can ignore any accidentals we might encounter.
The Name Part of an Interval: The Quality
Now what about the quality part of the interval? This is a little trickier and will take some practice and memorization on your behalf to get it down. First, we need to get all the cards on the table so to speak. Here are the most common types or qualities of intervals to be found in music. I have also included a couple that are uncommon because you should be aware fo them too.
- major
- minor
- diminished
- perfect
- augmented
- doubly diminished (not so common)
- doubly augmented (not so common)
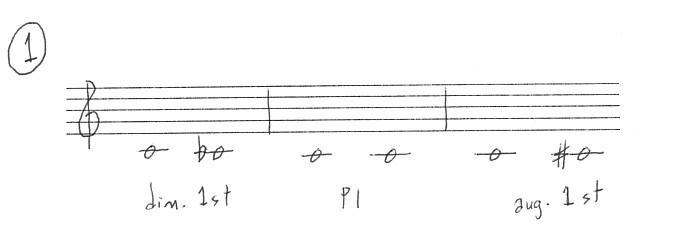
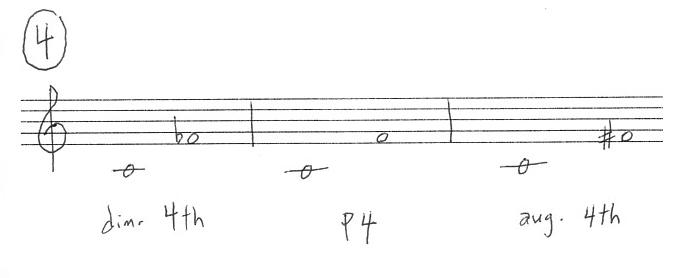
If we restrict ourselves to only 1 octave, only 1sts, 4ths, 5ths and 8ths can be: perfect, diminished, or augmented.
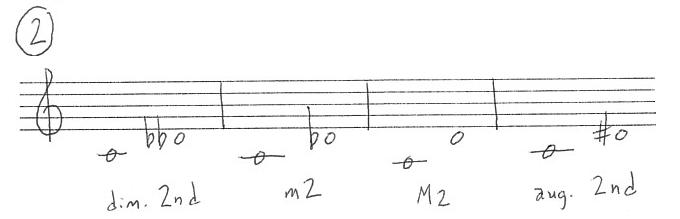
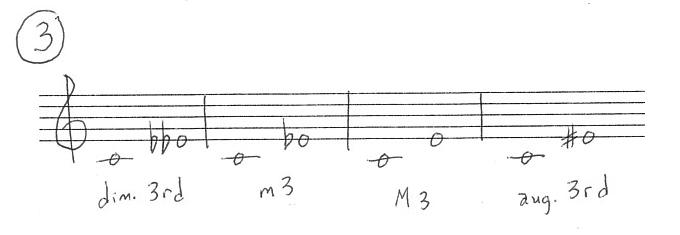
Again, if we limit ourselves to only 1 octave, only 2nds, 3rds, 6ths, and 7ths can be: major, minor, diminished, or augmented.
You might ask yourself why this is the case and that is a perfectly good question, but I don't have a real answer for you except that that's just the way it's done. You'll need to memorize this.
Diagram 8 tries to sum up these important rules:
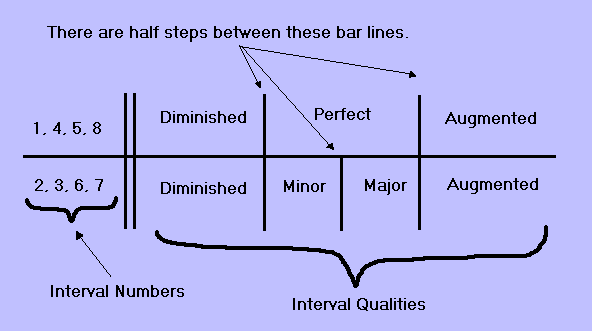
- You can never have a major or minor 1st, 4th, 5th or 8th. These numbers are only associated with the terms perfect, augmented, and diminished.
- You can never have a perfect 2nd, 3rd, 6th, or 7th. This term is only associated with 1sts, 4ths, 5ths, and 8ths.
- Remember, we are restricting ourselves to one octave here for simplicity's sake.
- As Diagram 8 illustrates, when a major interval is made bigger by 1 half step, the interval becomes augmented. When a major interval is made smaller by 1 half step, the interval becomes minor.
- When a minor interval is made smaller by 1 half step, it becomes diminished. When a minor interval is made bigger by 1 half step, it becomes a major interval.
- When a perfect interval is made bigger by 1 half step, it becomes augmented. When a perfect interval is made smaller by 1 half step it becomes diminished.
- When a diminished interval is made bigger by 1 half step it becomes a perfect interval in the case of a 1st, 4th, 5th, or 8th. In the case of a 2nd, 3rd, 6th, and 7th, it becomes a minor interval. This is a key point to understand. (We must take into account what kind of diminished interval we have.) Make sure this makes sense before moving on. When a diminished interval is made smaller by 1 half step, it becomes doubly diminished . (This is not that common of an interval, that's why I didn't include it on Diagram 8, but you should be aware of this term. You can also have a triply diminished interval and so on.)
- When an augmented interval is made smaller by 1 half step it becomes either a major interval or a perfect interval depending on its numeric value. When an augmented interval is made larger by 1 half step, it becomes doubly augmented. (Again, this is not that common of an interval, but you should be aware of this term.)
- Read these rules again and make sure they make sense before proceeding. Use Diagram 8 to aid your understanding. These are critical concepts and you can think of them as being "rules" because they are arbitrary. That is, someone made them up, but they have a logic to them and make sense after a little study.
Here are some examples to help illustrate these "rules":
Back to the Table of Contents.
How Interval Names Relate to Half Steps...
In the table below you will find a bunch of information about the most commonly used intervals in music. Please note: we have limited ourselves to one octave for simplicity's sake. Study this chart well. The chart shows how intervals are related to half steps. It also shows some common symbols that are often used to notate interval names.
Table 1 - How Interval Names Relate to Half Steps
| Interval Names | Commonly Used Symbols | Number of Half Steps | Examples in C Major |
|---|---|---|---|
| Perfect Prime (Unison) | 1, P1 | 0 | C1 to C1 |
| Minor 2nd | m2, -2, b2 | 1 | C to Db |
| Major 2nd | M2, 2 | 2 | C to D |
| Minor 3rd | m3, -3, b3 | 3 | C to Eb |
| Major 3rd | M3, 3 | 4 | C to E |
| Perfect 4th | 4, P4 | 5 | C to F |
| Augmented 4th (Tritone) | #4, +4, TT | 6 | C to F# |
| Diminished 5th (Tritone) | b5, TT | 6 | C to Gb |
| Perfect 5th | 5, P5 | 7 | C to G |
| Minor 6th | m6, -6, b6 | 8 | C to Ab |
| Major 6th | M6, 6 | 9 | C to A |
| Minor 7th | m7, -7, b7 | 10 | C to Bb |
| Major 7th | M7, 7 | 11 | C to B |
| Perfect 8th (Octave) | 8, P8 | 12 | C1 to C2 |
And Now Finally: The method to help you determine the name part of an interval. Use it after you have figured out the numeric part of an interval:
- Figure out how many half steps higher the top note is compared to the bottom note. Use Diagram 9 (below) to aid you.
- Once you have the number of half steps for the interval figured out, consult Table 1 to get the interval name.
- That's it. You're done. It's Miller time! Go home!
Back to the Table of Contents.
Putting It All Together...
Here are some examples to help you put it all together. Use Diagram 9 below, a picture of the chromatic scale, to help you count half steps. Remember, the chromatic scale is another name for the "12 notes of music" which were presented in Lesson 1.
Also remember that the distance between each adjacent note of the chromatic scale is one half step. This will be a handy diagram to look at when you need to sum up half steps between notes.
I also encourage you to try to play these examples using only one string on the guitar (that way you really see the length of the half steps of the interval) and then using two strings (this way will be much more practical in a "real" playing situation.) With all of the lesson material presented here and in the previous lessons, you should be able to figure this out. Example 1 below will get you started.
HINT: To play middle C on the guitar, play the note at the 3rd fret of the 5th string. With this hint, you should be able to figure out how the other notes on the guitar relate to the notes on a staff notated with a treble clef. Start by trying to figure out the natural notes first.) It is very important to be able to hear these intervals, so really do try to play them. If this is too vague, get Noad's book, the one I mentioned above, to help you with sight reading.

Example 1:
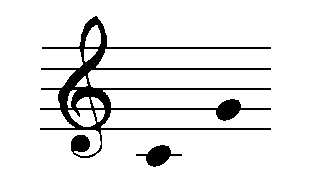
- The first thing we need to do is to identify the two note names. The bottom note is a C and the top note is a G. Now we need to identify the number part of the interval. C=1, D=2, E=3, F=4, G=5. We have some kind of a 5th. Remember, I refer to this step as "counting the alphabet."
- Now using Diagram 9, count how many half steps higher the G note is above the C note. The answer is 7. Now consult Table 1 to get the name part of the interval. Since we have 7 half steps, we have a Perfect 5th.
- To play this interval on the guitar using only one string, locate the first note, the C note, at the 3rd fret of the 5th string. Now count 7 half steps higher on the same string to get to the second note. This brings us to the 10th fret which is indeed a G note. Play these two notes, one after another. That's what a perfect 5th sounds like.
- To play these two notes at the same time (on different strings) still play the C at the 3rd fret of the A string, but now play the G note at the 5th fret of the 4th string, the D string. Consult the picture below. This interval is also a very cool "chord" (it's really just an interval) and is known as a power chord.
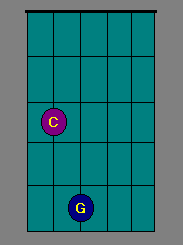
There are a couple of different ways to finger this chord. You can play the C note with the first finger and the G note with the 3rd or 4th finger. Both fingerings are fine. Do whichever one feels more comfortable. I use either fingering depending on what I'm going to play next, etc.
A Side Note: This is a cool chord to know because you can play it over both a major and a minor chord because it contains no 3rd. The 3rd of a chord determines its quality - whether a chord is major or minor. (Perhaps that's the "power" of it! More to come on this subject in later lessons.)
In the case of a C major chord, the notes are C, E, G. In the case of a C minor chord, the notes are C, Eb, G. The C power chord (also noted as C5) only contains the notes C and G - two notes that are common to both the C major chord and the C minor chord. That's why you can play it over either a C major or a C minor chord and have it sound "fine."
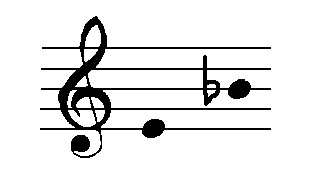
Example 2:
Here are the steps used to identify this interval as well as any interval assuming the interval is not greater than an octave.
- First, identify the names of the 2 notes of the interval.
- Secondly, identify the number part of the interval by "counting the alphabet."
- Finally, identify the name part of the interval by counting how many half steps the 2nd note is above the first note. Consult Diagram 9. Then consult Table 1 to get the name of the interval.
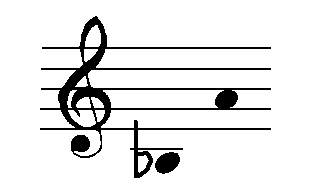
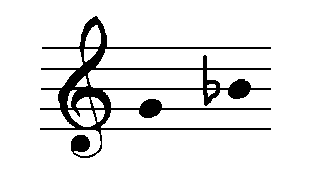
Example 3: For your convenience: Diagram 9, Table 1.
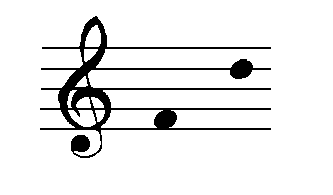
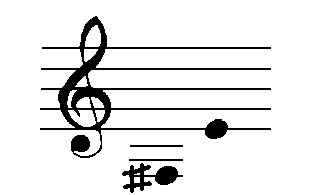
Example 4: Diagram 9, Table 1.
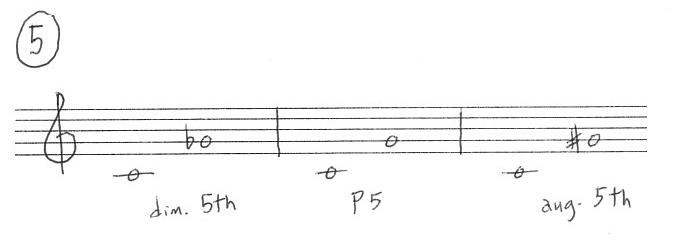
Example 5: Diagram 9, Table 1.
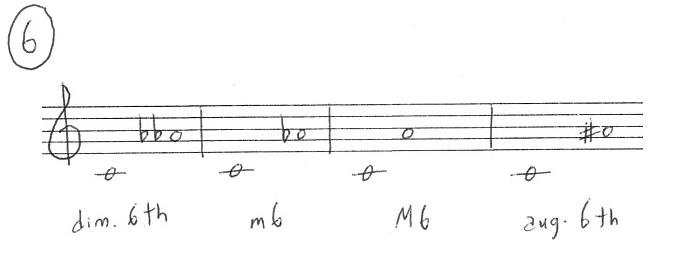
Example 6: Diagram 9, Table 1.
Epilogue...
And just when you thought you were done, here's a comprehensive interval guide for you to check out. It's imperative that you understand how intervals work as they are the essential building blocks from which all other music theory concepts are built. If intervals make good sense to you, then everything else will fall into place.
Finally, if you made it this far you deserve a reward (and so do I for making such a great lesson, right?) Go treat yourself to an ice cream cone or something sweet, but be sure to brush your teeth afterwards. And don't forget to floss before you go to bed. You'll thank me later.
Proceed to Lesson 6 or go back to the main menu.